quick_start copy 2.md 26 KB
集成Open API
Open API是一个标准,它的主要作用是描述REST API,既可以作为文档给开发者阅读,又可以让机器根据这个文档自动生成客户端代码等。
在Spring Boot应用中,假设我们编写了一堆REST API,如何添加Open API的支持?
我们只需要在pom.xml中加入以下依赖:
org.springdoc:springdoc-openapi-starter-webmvc-ui:2.0.0
然后呢?没有然后了,直接启动应用,打开浏览器输入http://localhost:8080/swagger-ui.html:
立刻可以看到自动生成的API文档,这里列出了3个API,来自api-controller(因为定义在ApiController这个类中),点击某个API还可以交互,即输入API参数,点“Try it out”按钮,获得运行结果。
是不是太方便了!
因为我们引入springdoc-openapi-ui这个依赖后,它自动引入Swagger UI用来创建API文档。可以给API加入一些描述信息,例如:
@RestController
@RequestMapping("/api")
public class ApiController {
    ...
    @Operation(summary = "Get specific user object by it's id.")
	@GetMapping("/users/{id}")
	public User user(@Parameter(description = "id of the user.") @PathVariable("id") long id) {
		return userService.getUserById(id);
	}
    ...
}
@Operation可以对API进行描述,@Parameter可以对参数进行描述,它们的目的是用于生成API文档的描述信息。添加了描述的API文档如下:
大多数情况下,不需要任何配置,我们就直接得到了一个运行时动态生成的可交互的API文档,该API文档总是和代码保持同步,大大简化了文档的编写工作。
要自定义文档的样式、控制某些API显示等,请参考springdoc文档。
配置反向代理
如果在服务器上,用户访问的域名是https://example.com,但内部是通过类似Nginx这样的反向代理访问实际的Spring Boot应用,比如http://localhost:8080,这个时候,在页面https://example.com/swagger-ui.html上,显示的URL仍然是http://localhost:8080,这样一来,就无法直接在页面执行API,非常不方便。
这是因为Spring Boot内置的Tomcat默认获取的服务器名称是localhost,端口是实际监听端口,而不是对外暴露的域名和80或443端口。要让Tomcat获取到对外暴露的域名等信息,必须在Nginx配置中传入必要的HTTP Header,常用的配置如下:
# Nginx配置
server {
    ...
    location / {
        proxy_pass http://localhost:8080;
        proxy_set_header Host $host;
        proxy_set_header X-Real-IP $remote_addr;
        proxy_set_header X-Forwarded-Proto $scheme;
        proxy_set_header X-Forwarded-For $proxy_add_x_forwarded_for;
    }
    ...
}
然后,在Spring Boot的application.yml中,加入如下配置:
server:
  # 实际监听端口:
  port: 8080
  # 从反向代理读取相关的HTTP Header:
  forward-headers-strategy: native
重启Spring Boot应用,即可在Swagger中显示正确的URL。
集成Artemis
Last updated: 5/18/2019 18:28 / Reads: 111608
ActiveMQ Artemis是一个JMS服务器,在集成JMS一节中我们已经详细讨论了如何在Spring中集成Artemis,本节我们讨论如何在Spring Boot中集成Artemis。
我们还是以实际工程为例,创建一个springboot-jms工程,引入的依赖除了spring-boot-starter-web,spring-boot-starter-jdbc等以外,新增spring-boot-starter-artemis:
<dependency>
    <groupId>org.springframework.boot</groupId>
    <artifactId>spring-boot-starter-artemis</artifactId>
</dependency>
同样无需指定版本号。
如何创建Artemis服务器我们已经在集成JMS一节中详细讲述了,此处不再重复。创建Artemis服务器后,我们在application.yml中加入相关配置:
spring:
  artemis:
    # 指定连接外部Artemis服务器,而不是启动嵌入式服务:
    mode: native
    # 服务器地址和端口号:
    host: 127.0.0.1
    port: 61616
    # 连接用户名和口令由创建Artemis服务器时指定:
    user: admin
    password: password
和Spring版本的JMS代码相比,使用Spring Boot集成JMS时,只要引入了spring-boot-starter-artemis,Spring Boot会自动创建JMS相关的ConnectionFactory、JmsListenerContainerFactory、JmsTemplate等,无需我们再手动配置了。
发送消息时只需要引入JmsTemplate:
@Component
public class MessagingService {
    @Autowired
    JmsTemplate jmsTemplate;

    public void sendMailMessage() throws Exception {
        String text = "...";
        jmsTemplate.send("jms/queue/mail", new MessageCreator() {
            public Message createMessage(Session session) throws JMSException {
                return session.createTextMessage(text);
            }
        });
    }
}
接收消息时只需要标注@JmsListener:
@Component
public class MailMessageListener {
    final Logger logger = LoggerFactory.getLogger(getClass());

    @JmsListener(destination = "jms/queue/mail", concurrency = "10")
    public void onMailMessageReceived(Message message) throws Exception {
        logger.info("received message: " + message);
    }
}
可见,应用程序收发消息的逻辑和Spring中使用JMS完全相同,只是通过Spring Boot,我们把工程简化到只需要设定Artemis相关配置。
集成RabbitMQ
Last updated: 5/18/2019 18:07 / Reads: 339871
前面我们讲了ActiveMQ Artemis,它实现了JMS的消息服务协议。JMS是JavaEE的消息服务标准接口,但是,如果Java程序要和另一种语言编写的程序通过消息服务器进行通信,那么JMS就不太适合了。
AMQP是一种使用广泛的独立于语言的消息协议,它的全称是Advanced Message Queuing Protocol,即高级消息队列协议,它定义了一种二进制格式的消息流,任何编程语言都可以实现该协议。实际上,Artemis也支持AMQP,但实际应用最广泛的AMQP服务器是使用Erlang编写的RabbitMQ。
安装RabbitMQ
我们先从RabbitMQ的官网下载并安装RabbitMQ,安装和启动RabbitMQ请参考官方文档。要验证启动是否成功,可以访问RabbitMQ的管理后台http://localhost:15672,如能看到登录界面表示RabbitMQ启动成功:
RabbitMQ后台管理的默认用户名和口令均为guest。
AMQP协议
AMQP协议和前面我们介绍的JMS协议有所不同。在JMS中,有两种类型的消息通道:
- 点对点的Queue,即Producer发送消息到指定的Queue,接收方从Queue收取消息;
- 一对多的Topic,即Producer发送消息到指定的Topic,任意多个在线的接收方均可从Topic获得一份完整的消息副本。
但是AMQP协议比JMS要复杂一点,它只有Queue,没有Topic,并且引入了Exchange的概念。当Producer想要发送消息的时候,它将消息发送给Exchange,由Exchange将消息根据各种规则投递到一个或多个Queue:
                                      ┌───────┐
                                 ┌───>│Queue-1│
                  ┌──────────┐   │    └───────┘
              ┌──>│Exchange-1│───┤
┌──────────┐  │   └──────────┘   │    ┌───────┐
│Producer-1│──┤                  ├───>│Queue-2│
└──────────┘  │   ┌──────────┐   │    └───────┘
              └──>│Exchange-2│───┤
                  └──────────┘   │    ┌───────┐
                                 └───>│Queue-3│
                                      └───────┘
如果某个Exchange总是把消息发送到固定的Queue,那么这个消息通道就相当于JMS的Queue。如果某个Exchange把消息发送到多个Queue,那么这个消息通道就相当于JMS的Topic。和JMS的Topic相比,Exchange的投递规则更灵活,比如一个“登录成功”的消息被投递到Queue-1和Queue-2,而“登录失败”的消息则被投递到Queue-3。这些路由规则称之为Binding,通常都在RabbitMQ的管理后台设置。
我们以具体的业务为例子,在RabbitMQ中,首先创建3个Queue,分别用于发送邮件、短信和App通知:
创建Queue时注意到可配置为持久化(Durable)和非持久化(Transient),当Consumer不在线时,持久化的Queue会暂存消息,非持久化的Queue会丢弃消息。
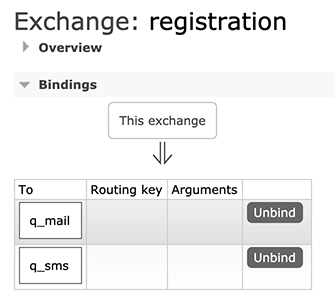
紧接着,我们在Exchanges中创建一个Direct类型的Exchange,命名为registration,并添加如下两个Binding:
上述Binding的规则就是:凡是发送到registration这个Exchange的消息,均被发送到q_mail和q_sms这两个Queue。
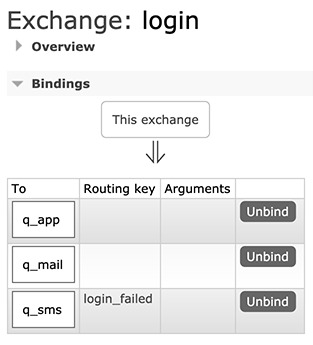
我们再创建一个Direct类型的Exchange,命名为login,并添加如下Binding:
上述Binding的规则稍微复杂一点,当发送消息给login这个Exchange时,如果消息没有指定Routing Key,则被投递到q_app和q_mail,如果消息指定了Routing Key="login_failed",那么消息被投递到q_sms。
配置好RabbitMQ后,我们就可以基于Spring Boot开发AMQP程序。
使用RabbitMQ
我们首先创建Spring Boot工程springboot-rabbitmq,并添加如下依赖引入RabbitMQ:
<dependency>
    <groupId>org.springframework.boot</groupId>
    <artifactId>spring-boot-starter-amqp</artifactId>
</dependency>
然后在application.yml中添加RabbitMQ相关配置:
spring:
  rabbitmq:
    host: localhost
    port: 5672
    username: guest
    password: guest
我们还需要在Application中添加一个MessageConverter:
import org.springframework.amqp.support.converter.MessageConverter;

@SpringBootApplication
public class Application {
    ...

    @Bean
    MessageConverter createMessageConverter() {
        return new Jackson2JsonMessageConverter();
    }
}
MessageConverter用于将Java对象转换为RabbitMQ的消息。默认情况下,Spring Boot使用SimpleMessageConverter,只能发送String和byte[]类型的消息,不太方便。使用Jackson2JsonMessageConverter,我们就可以发送JavaBean对象,由Spring Boot自动序列化为JSON并以文本消息传递。
因为引入了starter,所有RabbitMQ相关的Bean均自动装配,我们需要在Producer注入的是RabbitTemplate:
@Component
public class MessagingService {
    @Autowired
    RabbitTemplate rabbitTemplate;

    public void sendRegistrationMessage(RegistrationMessage msg) {
        rabbitTemplate.convertAndSend("registration", "", msg);
    }

    public void sendLoginMessage(LoginMessage msg) {
        String routingKey = msg.success ? "" : "login_failed";
        rabbitTemplate.convertAndSend("login", routingKey, msg);
    }
}
发送消息时,使用convertAndSend(exchange, routingKey, message)可以指定Exchange、Routing Key以及消息本身。这里传入JavaBean后会自动序列化为JSON文本。上述代码将RegistrationMessage发送到registration,将LoginMessage发送到login,并根据登录是否成功来指定Routing Key。
接收消息时,需要在消息处理的方法上标注@RabbitListener:
@Component
public class QueueMessageListener {
    final Logger logger = LoggerFactory.getLogger(getClass());

    static final String QUEUE_MAIL = "q_mail";
    static final String QUEUE_SMS = "q_sms";
    static final String QUEUE_APP = "q_app";

    @RabbitListener(queues = QUEUE_MAIL)
    public void onRegistrationMessageFromMailQueue(RegistrationMessage message) throws Exception {
        logger.info("queue {} received registration message: {}", QUEUE_MAIL, message);
    }

    @RabbitListener(queues = QUEUE_SMS)
    public void onRegistrationMessageFromSmsQueue(RegistrationMessage message) throws Exception {
        logger.info("queue {} received registration message: {}", QUEUE_SMS, message);
    }

    @RabbitListener(queues = QUEUE_MAIL)
    public void onLoginMessageFromMailQueue(LoginMessage message) throws Exception {
        logger.info("queue {} received message: {}", QUEUE_MAIL, message);
    }

    @RabbitListener(queues = QUEUE_SMS)
    public void onLoginMessageFromSmsQueue(LoginMessage message) throws Exception {
        logger.info("queue {} received message: {}", QUEUE_SMS, message);
    }

    @RabbitListener(queues = QUEUE_APP)
    public void onLoginMessageFromAppQueue(LoginMessage message) throws Exception {
        logger.info("queue {} received message: {}", QUEUE_APP, message);
    }
}
上述代码一共定义了5个Consumer,监听3个Queue。
启动应用程序,我们注册一个新用户,然后发送一条RegistrationMessage消息。此时,根据registration这个Exchange的设定,我们会在两个Queue收到消息:
... c.i.learnjava.service.UserService        : try register by bob@example.com...
... c.i.learnjava.web.UserController         : user registered: bob@example.com
... c.i.l.service.QueueMessageListener       : queue q_mail received registration message: [RegistrationMessage: email=bob@example.com, name=Bob, timestamp=1594559871495]
... c.i.l.service.QueueMessageListener       : queue q_sms received registration message: [RegistrationMessage: email=bob@example.com, name=Bob, timestamp=1594559871495]
当我们登录失败时,发送LoginMessage并设定Routing Key为login_failed,此时,只有q_sms会收到消息:
... c.i.learnjava.service.UserService        : try login by bob@example.com...
... c.i.l.service.QueueMessageListener       : queue q_sms received message: [LoginMessage: email=bob@example.com, name=(unknown), success=false, timestamp=1594559886722]
登录成功后,发送LoginMessage,此时,q_mail和q_app将收到消息:
... c.i.learnjava.service.UserService        : try login by bob@example.com...
... c.i.l.service.QueueMessageListener       : queue q_mail received message: [LoginMessage: email=bob@example.com, name=Bob, success=true, timestamp=1594559895251]
... c.i.l.service.QueueMessageListener       : queue q_app received message: [LoginMessage: email=bob@example.com, name=Bob, success=true, timestamp=1594559895251]
RabbitMQ还提供了使用Topic的Exchange(此Topic指消息的标签,并非JMS的Topic概念),可以使用*进行匹配并路由。可见,掌握RabbitMQ的核心是理解其消息的路由规则。
直接指定一个Queue并投递消息也是可以的,此时指定Routing Key为Queue的名称即可,因为RabbitMQ提供了一个default exchange用于根据Routing Key查找Queue并直接投递消息到指定的Queue。但是要实现一对多的投递就必须自己配置Exchange。
练习
集成Kafka
Last updated: 5/18/2019 18:27 / Reads: 299889
我们在前面已经介绍了JMS和AMQP,JMS是JavaEE的标准消息接口,Artemis是一个JMS实现产品,AMQP是跨语言的一个标准消息接口,RabbitMQ是一个AMQP实现产品。
Kafka也是一个消息服务器,它的特点一是快,二是有巨大的吞吐量,那么Kafka实现了什么标准消息接口呢?
Kafka没有实现任何标准的消息接口,它自己提供的API就是Kafka的接口。
哥没有实现任何标准,哥自己就是标准。
—— Kafka
Kafka本身是Scala编写的,运行在JVM之上。Producer和Consumer都通过Kafka的客户端使用网络来与之通信。从逻辑上讲,Kafka设计非常简单,它只有一种类似JMS的Topic的消息通道:
                              ┌──────────┐
                          ┌──>│Consumer-1│
                          │   └──────────┘
┌────────┐      ┌─────┐   │   ┌──────────┐
│Producer│─────>│Topic│───┼──>│Consumer-2│
└────────┘      └─────┘   │   └──────────┘
                          │   ┌──────────┐
                          └──>│Consumer-3│
                              └──────────┘
那么Kafka如何支持十万甚至百万的并发呢?答案是分区。Kafka的一个Topic可以有一个至多个Partition,并且可以分布到多台机器上:
            ┌ ─ ─ ─ ─ ─ ─ ─ ─ ─ ┐
             Topic
            │                   │
                ┌───────────┐        ┌──────────┐
            │┌─>│Partition-1│──┐│┌──>│Consumer-1│
             │  └───────────┘  │ │   └──────────┘
┌────────┐  ││  ┌───────────┐  │││   ┌──────────┐
│Producer│───┼─>│Partition-2│──┼─┼──>│Consumer-2│
└────────┘  ││  └───────────┘  │││   └──────────┘
             │  ┌───────────┐  │ │   ┌──────────┐
            │└─>│Partition-3│──┘│└──>│Consumer-3│
                └───────────┘        └──────────┘
            └ ─ ─ ─ ─ ─ ─ ─ ─ ─ ┘
Kafka只保证在一个Partition内部,消息是有序的,但是,存在多个Partition的情况下,Producer发送的3个消息会依次发送到Partition-1、Partition-2和Partition-3,Consumer从3个Partition接收的消息并不一定是Producer发送的顺序,因此,多个Partition只能保证接收消息大概率按发送时间有序,并不能保证完全按Producer发送的顺序。这一点在使用Kafka作为消息服务器时要特别注意,对发送顺序有严格要求的Topic只能有一个Partition。
Kafka的另一个特点是消息发送和接收都尽量使用批处理,一次处理几十甚至上百条消息,比一次一条效率要高很多。
最后要注意的是消息的持久性。Kafka总是将消息写入Partition对应的文件,消息保存多久取决于服务器的配置,可以按照时间删除(默认3天),也可以按照文件大小删除,因此,只要Consumer在离线期内的消息还没有被删除,再次上线仍然可以接收到完整的消息流。这一功能实际上是客户端自己实现的,客户端会存储它接收到的最后一个消息的offsetId,再次上线后按上次的offsetId查询。offsetId是Kafka标识某个Partion的每一条消息的递增整数,客户端通常将它存储在ZooKeeper中。
有了Kafka消息设计的基本概念,我们来看看如何在Spring Boot中使用Kafka。
安装Kafka
首先从Kafka官网下载最新版Kafaka,解压后在bin目录找到两个文件:
zookeeper-server-start.sh:启动ZooKeeper(已内置在Kafka中);kafka-server-start.sh:启动Kafka。
先启动ZooKeeper:
$ ./zookeeper-server-start.sh ../config/zookeeper.properties
再启动Kafka:
./kafka-server-start.sh ../config/server.properties
看到如下输出表示启动成功:
... INFO [KafkaServer id=0] started (kafka.server.KafkaServer)
如果要关闭Kafka和ZooKeeper,依次按Ctrl-C退出即可。注意这是在本地开发时使用Kafka的方式,线上Kafka服务推荐使用云服务厂商托管模式(AWS的MSK,阿里云的消息队列Kafka版)。
使用Kafka
在Spring Boot中使用Kafka,首先要引入依赖:
<dependency>
    <groupId>org.springframework.kafka</groupId>
    <artifactId>spring-kafka</artifactId>
</dependency>
注意这个依赖是spring-kafka项目提供的。
然后,在application.yml中添加Kafka配置:
spring:
  kafka:
    bootstrap-servers: localhost:9092
    consumer:
      auto-offset-reset: latest
      max-poll-records: 100
      max-partition-fetch-bytes: 1000000
除了bootstrap-servers必须指定外,consumer相关的配置项均为调优选项。例如,max-poll-records表示一次最多抓取100条消息。配置名称去哪里看?IDE里定义一个KafkaProperties.Consumer的变量:
KafkaProperties.Consumer c = null;
然后按住Ctrl查看源码即可。
发送消息
Spring Boot自动为我们创建一个KafkaTemplate用于发送消息。注意到这是一个泛型类,而默认配置总是使用String作为Kafka消息的类型,所以注入KafkaTemplate<String, String>即可:
@Component
public class MessagingService {
    @Autowired ObjectMapper objectMapper;

    @Autowired KafkaTemplate<String, String> kafkaTemplate;

    public void sendRegistrationMessage(RegistrationMessage msg) throws IOException {
        send("topic_registration", msg);
    }

    public void sendLoginMessage(LoginMessage msg) throws IOException {
        send("topic_login", msg);
    }

    private void send(String topic, Object msg) throws IOException {
        ProducerRecord<String, String> pr = new ProducerRecord<>(topic, objectMapper.writeValueAsString(msg));
        pr.headers().add("type", msg.getClass().getName().getBytes(StandardCharsets.UTF_8));
        kafkaTemplate.send(pr);
    }
}
发送消息时,需指定Topic名称,消息正文。为了发送一个JavaBean,这里我们没有使用MessageConverter来转换JavaBean,而是直接把消息类型作为Header添加到消息中,Header名称为type,值为Class全名。消息正文是序列化的JSON。
接收消息
接收消息可以使用@KafkaListener注解:
@Component
public class TopicMessageListener {
    private final Logger logger = LoggerFactory.getLogger(getClass());

    @Autowired
    ObjectMapper objectMapper;

    @KafkaListener(topics = "topic_registration", groupId = "group1")
    public void onRegistrationMessage(@Payload String message, @Header("type") String type) throws Exception {
        RegistrationMessage msg = objectMapper.readValue(message, getType(type));
        logger.info("received registration message: {}", msg);
    }

    @KafkaListener(topics = "topic_login", groupId = "group1")
    public void onLoginMessage(@Payload String message, @Header("type") String type) throws Exception {
        LoginMessage msg = objectMapper.readValue(message, getType(type));
        logger.info("received login message: {}", msg);
    }

    @KafkaListener(topics = "topic_login", groupId = "group2")
    public void processLoginMessage(@Payload String message, @Header("type") String type) throws Exception {
        LoginMessage msg = objectMapper.readValue(message, getType(type));
        logger.info("process login message: {}", msg);
    }

    @SuppressWarnings("unchecked")
    private static <T> Class<T> getType(String type) {
        // TODO: use cache:
        try {
            return (Class<T>) Class.forName(type);
        } catch (ClassNotFoundException e) {
            throw new RuntimeException(e);
        }
    }
}
在接收消息的方法中,使用@Payload表示传入的是消息正文,使用@Header可传入消息的指定Header,这里传入@Header("type"),就是我们发送消息时指定的Class全名。接收消息时,我们需要根据Class全名来反序列化获得JavaBean。
上述代码一共定义了3个Listener,其中有两个方法监听的是同一个Topic,但它们的Group ID不同。假设Producer发送的消息流是A、B、C、D,Group ID不同表示这是两个不同的Consumer,它们将分别收取完整的消息流,即各自均收到A、B、C、D。Group ID相同的多个Consumer实际上被视作一个Consumer,即如果有两个Group ID相同的Consumer,那么它们各自收到的很可能是A、C和B、D。
运行应用程序,注册新用户后,观察日志输出:
... c.i.learnjava.service.UserService        : try register by bob@example.com...
... c.i.learnjava.web.UserController         : user registered: bob@example.com
... c.i.l.service.TopicMessageListener       : received registration message: [RegistrationMessage: email=bob@example.com, name=Bob, timestamp=1594637517458]
用户登录后,观察日志输出:
... c.i.learnjava.service.UserService        : try login by bob@example.com...
... c.i.l.service.TopicMessageListener       : received login message: [LoginMessage: email=bob@example.com, name=Bob, success=true, timestamp=1594637523470]
... c.i.l.service.TopicMessageListener       : process login message: [LoginMessage: email=bob@example.com, name=Bob, success=true, timestamp=1594637523470]
因为Group ID不同,同一个消息被两个Consumer分别独立接收。如果把Group ID改为相同,那么同一个消息只会被两者之一接收。
有细心的童鞋可能会问,在Kafka中是如何创建Topic的?又如何指定某个Topic的分区数量?
实际上开发使用的Kafka默认允许自动创建Topic,创建Topic时默认的分区数量是2,可以通过server.properties修改默认分区数量。
在生产环境中通常会关闭自动创建功能,Topic需要由运维人员先创建好。和RabbitMQ相比,Kafka并不提供网页版管理后台,管理Topic需要使用命令行,比较繁琐,只有云服务商通常会提供更友好的管理后台。


